If you are looking for an affordable and effective way how to make wood storm windows to keep your home warm and cozy during the winter, a DIY wood storm window may be needed. Storm windows are ideal for blocking out the elements and keeping the heat inside your home, and with a little bit of time and effort, you can easily create your own from scratch.
You will need a couple of Stanley storm hangers to install your storm in its opening to get started. Then, secure the wood storm window to the sill using hooks or eyes, depending on how strong the wind is in your area. Finally, admire your finished product and enjoy all of the energy savings that come with it!
Necessary tools and materials for making wood storm windows:
- Wood
- Drill/Driver
- Fiberglass.
- Tape measure
- Wood-clad.
- Glass cutter
- Glazier’s Knife
How to make wood storm windows? (7 simple steps)
Step 1 – Choosing Wood for windows:
When it comes to creating an outdoor enclosure resistant to harsh weather conditions, wood is a top choice. Whether you are planning to varnish or paint your wood, choosing a material that will stand up to outdoor elements is essential. For this reason, pine is often a good option, as it is both inexpensive and durable. Alternatively, cedar or redwood can provide additional strength and durability for longer-lasting results. No matter which type of wood you choose for your project, the key is to select pieces 1×2 inches in size to create your frame quickly. With the right tools and materials, you can easily set up storm windows made of wood and protect your home from wind and rain.
The first step to making a wood storm window is to select an appropriately-sized wooden frame. You will also need foam weather stripping, caulk, and other necessary hardware or tools, such as hinges or hooks for Eastern-style casings.

Step 2 – Determine the Thickness:
Determining thickness is an important part of making wood storm windows. Depending on the window exterior thickness, it will be 3/4″ and 11/8″ thick, depending on your window’s exterior trim thickness. You can use standard 1x material to make your DIY storm window. If your window’s trim is thicker than 3/4″, you have a few options. You can either use thicker lumber or fur out the blind stop so that only 3/4″ of it remains.
While commercial storm windows can be expensive, wood storm windows are a much more affordable option. And, if you’re handy with tools, you can probably build them yourself in the afternoon. The first step is to determine the thickness of your window’s exterior trim.
Step 3 – Measure the Opening:
 Measure the height, width, and meeting rail height. It’s essential to keep in mind that, in an old house, just because the measurement on the left side of the window is 60″ doesn’t mean that the height on the right side will be the same. You should subtract 1/4″ from the outer dimensions to give the storm windows the necessary tolerances to fit. For example, if your window measures 32″ x 60″, you want to make your finished wood storm 31 3/4″ x 59 3/4″. Please take a few measurements across the window to ensure that it is level and square. If it’s not, you may need to adjust your sizes accordingly.
Step 4 – Cut the Storm Window Frame:
If you want to make your own wood storm windows, the first step is to gather the necessary materials. To do this, you will need a rot-resistant type of wood, such as pine or cedar. It would be best if you also had a saw or other cutting tools handy and any other essential tools like screwdrivers and clamps.
Once you have the materials ready, start by cutting your stock into pieces according to a specific recipe or cut list. The widths and lengths will depend on the size of your windows, but generally speaking, each window will need one strip of wood measuring 1×4 and one ribbon measuring 1×6. As you cut these pieces out, be sure to take care while using your saw to minimize splintering and cracking.
Finally, once all of your pieces are cut out, it’s time to proceed with the actual assembly process. Start by ripping the 1×6 pieces down the center using a handsaw or power saw. Next, use an adhesive such as glue or caulk to adhere these two halves to either side of the 1×4 strips to create secure window frames that stand up to harsh weather conditions. Finally, once everything is assembled and dried thoroughly, install your
Step 5 – Drill & Assemble:
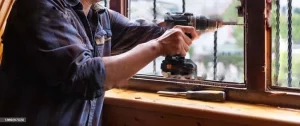 To create your wood storm windows, you will need to start by assembling your frame. Begin by laying out all of the pieces and carefully checking your work to ensure that everything is aligned correctly. Next, measure and mark where your meeting rail should go, and then use this as a guide for drilling your pocket holes.
Hoping a pocket hole jig like the Kreg K4 can make this step easier. This handy tool comes with a vacuum attachment to help keep sawdust at bay, which can be very helpful in preventing problems during assembly.
Once you have completed this step, clamp your frame together and install the screws, adding some wood glue along the edges where you have drilled the pockets holes. Finally, you will need to install the dowels according to the instructions that come with your window kit, using waterproof wood glue for added stability and durability. And with that, your wood storm windows will be ready for use!
Step 6 – Cut and Fit Glass:
When making your wood storm windows, the first step is to select your glass. There are many different options, including double-strength glass and glass with a Low-E coating for added insulation. The glass should be about 1/16″ smaller than the storm frame so that it has some space to expand to ensure that your storm windows fit correctly.
Once you have chosen your glass, the next step is to cut it to size. It can be done quickly using specialized tools like a glass cutter or scoring knife. Once your glass is cut to size, you can begin fitting it into the storm frame, ensuring that there is enough space for it to expand as needed. Finally, sealing your storm window with caulk or other weatherproofing materials will help protect it from damaging elements like water and wind. With these simple steps, you can create beautiful wooden storm windows that will keep your home safe and comfortable.
Step 7 – Glazing:
To get started, begin by applying a thin layer of Sarco MultiGlaze putty to the glazing rabbet of your window. Next, press your glass into the putty so that only a thin line of it is visible on the interior side. Once your glass is in place, secure it with glazing points – these will help hold the window in place and prevent any air or water from getting in.
To finish off your storm window, apply a beveled line of glazing putty along the front face of your glass and smooth it out with a tool, such as a scraper or a spatula.
Step 8 – Attach the Window:
You will use the foam weather stripping to attach the wooden frame to the opening in your house window. This can be done by pressing it tightly into place or using hooks or hangers if you are working with an Eastern-style casing. Next, seal the entire frame with caulk around the edges, ensuring an airtight fit. And that’s all there is to it – enjoy your new wood storm windows and stay warm and dry all winter long!
Conclusion:
If you want to add a touch of style and function to your home, consider installing a wood storm window. It is a great way to keep your interior spaces warm and comfortable during the colder months while also adding some protection against the elements.